Vim - Nifty commands to enhance your editing experience

Vim - which has its humble beginnings as the console based default editor of the Unix OS, has over the years attained some street cred as one of the preferred editors for developers. With a large scope for customization , extensive open-source community support and systematic documentation, it has come into its own as a reliable editor with chops.
Today, we look at a few commands that can be used in the vim editor for enhancing the editing experience as a developer.
Find and Replace
Let's start with a simple feature that is a staple in all GUI editors. For performing a simple search, we need to go to the command mode (by pressing the ESC key), type forward slash (/) and begin typing out the word or pattern you want to search.
In order to replace a certain string with another in the entire document, the syntax will be as follows:
:<range>s/<search-pattern>/<new-replacement-string>/<flags>
Syntax break-down
| Character | Significance |
| <range> | Specify the range of lines for which the substitution must be performed, % for the entire document |
| s | command for substitute |
| / | delimiter to separate the different parts of the command - can be /,#,@ or any special character |
| <search-pattern> and <new-replacement-string> | are the placeholders for the search pattern/string and new string respectively |
| <flags> | Different flags to indicate specific treatment. The most commonly used one is g (global) which indicates the substitution is to be done for all occurences of the search pattern. |
Consider the following example where all the occurrences of the string "onclick" are substituted with "onHover"

This substitution feature can be extended for performing other tasks as well, using variations of the same command as follows:
Adding a character at the end of each line in the document
Following is the command that will insert a semi-colon at the end of each line in the file
:%s/$/;/g
The $ sign in the above example is a wild-card to represent the end-of-line character. It is important to note that special characters will be interpreted as wild-cards in the first half representing the search string, whereas if the same special character appears in the second half i.e as a part of the new replacement string , it will be substituted as-is.
Targeting a specific range of lines
Instead of the "%" sign in the command syntax, we can specify a range of lines where we want the substitution to be performed. For instance, if you want to comment lines 4-10 of a shell script, then that would involve placing a "#" at the beginning of each line in the given range.
:4,10s/^/#/g
The "^" (caret) sign after s in the above example signifies the beginning of the line.
Ignore case while finding the string
Adding the "i" option at the end of the command ensures case-insensitive search of the given string "hello" as follows:
:%s/hello/hi/gi
Interactive find and replace
The "c" flag ensures that every replacement of the mentioned string occurence is done only on user confirmation.
:%s/hello/hi/gc
The above command waits for the user to input y/n at each occurrence of the string "hello" before replacement, thereby giving the user control over what all instances need to be replaced.
Using regular expressions
We can use regular expression to search for a specific pattern before replacing it with another. Consider the below command for substituting all instances of phone number with * in case you don't want the numbers to be stored
:%s/\d\d-\d\{10}/******/g
\d is the wild card for matching digits 0-9. The command searches for a pattern of the type - 2-digit country code followed by a 10-digit phone number separated by hyphen - and replaces the pattern with **. The possibilities with regular expressions are endless. Do check out the entire list of wildcards here .
Recording
If you have a particular sequence of steps that you want performed repeatedly for a certain number of lines, vim has an excellent feature called recording which can accomplish this for you.
As the name suggests, this command allows the user to "record" a sequence of steps for a single line, which can then be applied to n other lines as per the user input. Following are the high level steps for recording:
Enter the command mode by pressing the <ESC> key. To begin recording, press
qfollowed by any lower case character to name the record/macro. The character indicates the register to which the operations will be stored.Perform any editing operations inside the vim editor. The sequence of actions performed will be stored in the macro.
Once completed, ensure you are still in command mode and press
qagain to end the recording.Replay the steps recorded for any number of lines using the command
N@<macro-name>where N is the number of lines.
Recording Example - Building an sql script
Let us understand this with a real-world example. Let us consider a comma-separated file which has the contents to be inserted in a database table "tab1" having two columns ROLL_NUMBER and STUDENT_NAME.
Our task is to create an sql file containing the INSERT statements for the data in the file. Let us examine the exact sequence of steps to be followed.
Open the file using the vim editor. Position the cursor at the first position in the file and enter the command mode.
Our motive is to pre-fix each line with the string "INSERT INTO TAB1 VALUES (" and attach the text ");" at the end. Further, since the STUDENT_NAME, which is the second column is a string value, it needs to be enclosed in single quotes (').
Press
qfollowed by lettera(macro name) to start the recording. The same is indicated in the lower left corner in the command area.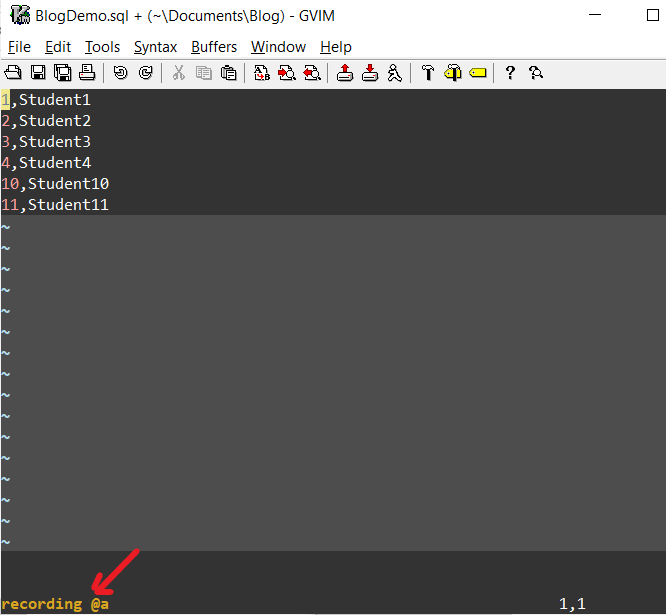
Now, press
ito enter the insert mode in vim and start typingINSERT INTO TAB1 VALUES (in the first line.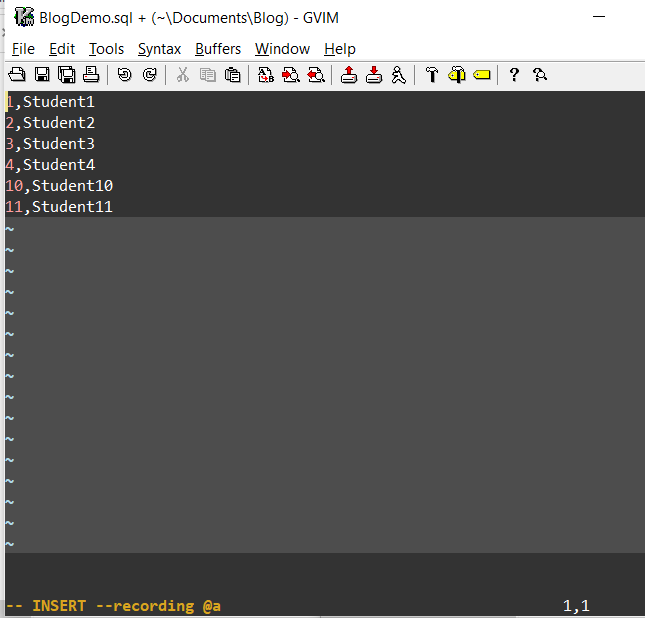
As we proceed in sequence scanning the line, our next step is to enter the opening quote before the Student name value. For this, we enter command mode by pressing
ESCand enterf,. This positions the cursor at the first comma (,) from the current cursor position. Press the right arrow key to go one step further. Now enter the insert mode and enter the opening quote ('). Note this step as it is important and we will come back to it later.Re-enter command mode, press <SHIFT>+a to go to the end of the line in insert mode. Now enter, the closing quote('), the closing bracket and the semi-colon (;).
Before ending the macro, we need to position the cursor at the beginning of the next line so as to aid easy repetition of steps across lines. Press
ESCkey for command mode and press+. The final screen after steps 5,6 and 7 looks like this: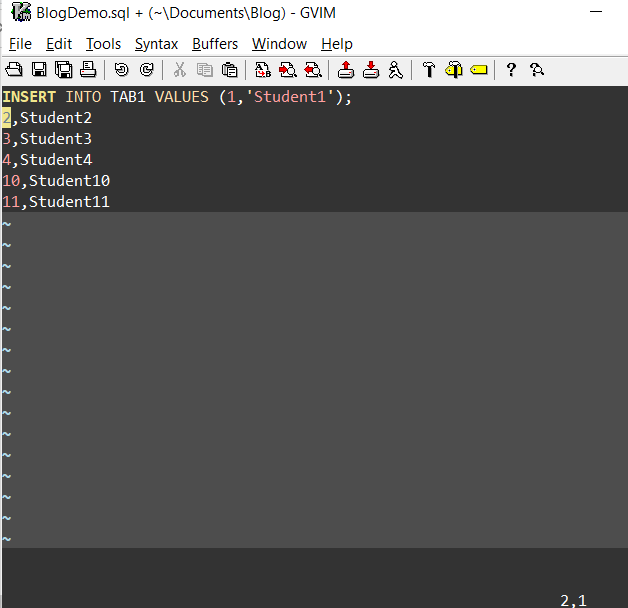
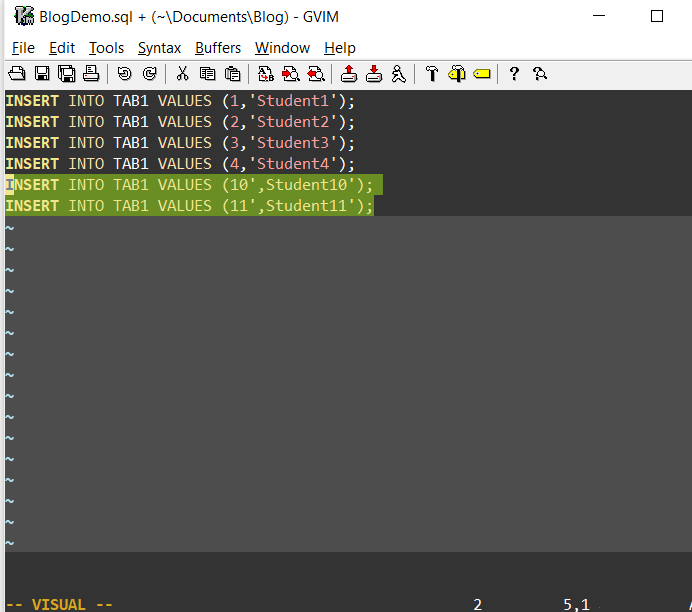
Press
qto end the recording.Now, we need to enter the command to replay the recorded steps in macro "a" across the remaining 5 lines using
5@a. The following GIF shows the final output.

Our task has been completed successfully.
An interesting aside :
In step 5 above, we used the seek command i.e. f, to seek the comma position before inserting the opening quote. What if, instead of this, we had manually moved the cursor to the point before the student name value using right arrow key repeatedly.
In that case, the macro output would be something like below:
At the first glance nothing seems amiss, which is why I have highlighted the last two lines. Here, the opening quote has been added before the comma instead of after while replaying the recording.
Why did this happen? Well, that's because, while replaying the recorded steps, vim repeats each key-stroke performed for the first or recorded line, across the remaining lines. In the first 4 lines, the ROLL_NO column is a single-digit number which means that it would take the same number of right arrow keystrokes (from the open bracket position) to reach the beginning of the student name value where the opening quote is to be placed. However, in the last two lines, the ROLL_NO is a double-digit value which results in the misplacement of the quote. To avoid this, we first seek the comma position and then navigate to the right position to place the opening quote. Hence, the moral of the story is to bear in mind all possible scenarios and make the recording as universal as possible.
Delete blank lines
While this is not a feature like the others mentioned above, there is a useful command that can eliminate all the blank lines in a file.
:g/^$/d
Though this command deletes blank lines, those lines which are otherwise blank but have spaces or tabs in them will not be eliminated. To make the above command target all sorts of blank lines including those containing whitespace characters, it can be modified as
:g/^\s*$/d
Vim is capable of all this and much more when it comes to editing. Hope this post managed to make you consider vim as your coding editor if it is not already.


